
How a Subtle Issue Like Coffee Roaster Sensor Drift Can Ruin Your Roast
When the final cup doesn’t match your target flavor, you may have already tried every technical adjustment you know, such as tweaking your roast profile and fine-tuning your process. Yet despite these efforts, uneven results still appear. This often leads you deeper into the fundamentals of roasting, making you wonder whether the problem lies not in your method, but in the temperature data. In many cases, the real culprit is sensor drift, which affects measurement accuracy and makes consistent results harder to achieve.
If you want to dive deeper into what coffee roaster sensor drift actually is, and how to keep your machine’s sensors reliable through proper calibration, we’ll break it all down in this blog. Let’s go!
What Is Sensor Drift in Coffee Roasters?
Sensor drift is the gradual loss of accuracy in a temperature sensor over time. In coffee roasting, this means the temperature shown on your roaster may no longer match the actual conditions inside the machine. The change is usually so subtle that you don’t notice it until your roast profiles start behaving differently or your cup quality shifts unexpectedly.
One of the sensors most prone to drift is the temperature probe, which is used to measure Bean Temperature (BT) and Environmental Temperature (ET). When a probe begins to drift or respond more slowly, the data used to calculate the Rate of Rise (RoR) becomes unreliable. Since RoR is based on how quickly temperature changes over time, a small inaccuracy can distort the curve. A drifting or lagging probe may also cause the RoR to appear flatter or delayed, especially during critical stages like first crack or the development phase. This can mislead the roaster into making incorrect adjustments, and the final result tends to be over- or underdeveloped.
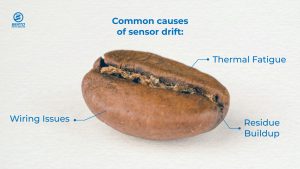
Common Causes of Sensor Drift in Coffee Roasting Machines
In most cases, sensor drift happens gradually and often depends on how well you maintain your coffee roasting machine, as well as the condition of your probes. Here’s a closer look at what typically causes sensor drift:
Thermal Fatigue
Repeated exposure to the high roasting temperatures can slowly degrade a sensor’s internal components. Temperature probes such as thermocouples are especially vulnerable to this kind of long-term heat stress.
Residue Build-up
Oils, coffee chaff, and other residue buildup from the roasting process can accumulate on the sensor surface. This build-up can insulate the probe, which decreases its response time or distorts the reading accuracy.
Mechanical Wear or Wiring Issues
Vibrations, physical stress, or oxidation in the sensor’s wiring or connectors can interfere with signal accuracy. Over time, this mechanical wear can lead to inconsistent or unreliable temperature readings.
To address these common issues and prevent sensor drift, start with regular probe cleaning, ideally once a week or more often if you’re roasting at high volume. Use a soft cloth or brush, and avoid abrasive materials that could scratch or damage the sensor. For oil and chaff buildup, perform a deep clean of the roasting chamber as part of your weekly maintenance routine.
Inspect the wiring at least once a month for signs of wear, loose connections, or corrosion. If you notice any oxidized wires or damaged connectors, replace them immediately to maintain accurate temperature readings.
Restoring Your Sensor Data Integrity with Calibration
After you’ve replaced any worn parts or cleaned the probes in your coffee roasting machine properly, the next important step is performing a sensor calibration. This process involves checking your sensor readings against a reliable reference point and adjusting them to correct any drift that may have developed over time. It ensures that the temperature data on your roasting software accurately reflects the real conditions inside your machine.
To calibrate your temperature probe, start by removing it from the roaster. Place the tip in boiling water, which should read approximately 100 °C or 212°F at sea level. Then place it in an ice water bath, which should read 0 °C or 32°F. If the probe readings differ from these reference points, you can perform an offset correction using roasting software or if your machine is integrated with a PID controller, you can use that to apply the offset.
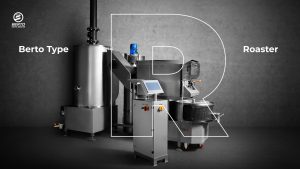
In Berto Roaster, calibration is designed to be seamless. Models like the Berto Essential Air and Berto Essential are compatible with Cropster and Artisan, allowing you to adjust sensor offsets through software. Berto Type D Roaster and Berto Type R Roaster include integrated PID systems, which give you greater options to fine-tune the sensor.
Why You Should Calibrate Before Recording Roast Data
Modern coffee roasting machines often come with features that let you record and replicate your roast profiles. Berto Roaster, as modern coffee roasting machines, are equipped with Playback Assist™ to record your roast profile from a computer. For more streamlined control, Berto Type R Roaster with an integrated PID sensor offers Recipe mode to pre-program roast variables directly in the roaster control panel for a fully automated batch.
These features can be incredibly helpful for simplifying your workflow and aiming for consistency. But if your sensors aren’t properly calibrated, you might be recording the wrong data without realizing it.
When sensor drift occurs and is left unchecked, the temperature readings recorded by your roast software no longer reflect what’s actually happening inside the coffee roasting machine. So even if the curve looks perfect on screen, it’s actually based on inaccurate information. That means any profile you save and try to replicate later is already off and your next batch may deliver inconsistent results.
So always perform regular sensor calibration to make your records stay aligned with what’s really happening inside the roasting machine and keep your profiles reliable for the next time around.
Extra Tips to Prevent and Track Sensor Drift
If regularly cleaning your coffee roaster is already marked on your calendar and you’re confident in performing proper calibration, there are a few more steps you can take to further reduce sensor drift and keep your temperature data reliable:
Recheck calibration every 3–6 months
Make sensor calibration also a consistent habit. A good rule of thumb is to recalibrate every 3 months for high-volume production or every 6 months for smaller operations. This would catch subtle drift before it affects your roast consistency.
Install Probes in the Right Location
When installing or upgrading your temperature probes, the placement must avoid areas with direct flame contact or excessive vibration to protect the sensor from mechanical stress.
Keep a Maintenance and Calibration Log
Document all maintenance activities, such as cleaning routines and calibration results, in a logbook or digital devices. This helps you catch early signs of drift and stay ahead of potential issues.
Prevent Sensor Drift and Make the Temperature Reading Accurate
Coffee roaster sensor drift is inevitable, but that doesn’t mean you can’t manage it. With a combination of routine maintenance and regular sensor calibration, you can keep your temperature readings precise and your roast data reliable. And when your data is accurate, your results in the cup become consistently better.
If you’re looking for a roasting machine that makes calibration seamless and delivers repeatable results you can rely on, Berto Roaster is built for that purpose. Contact us today to learn how Berto can support your precision and consistent roast every time.
Related Roasters


Related Article
Understanding the Rate of Rise (RoR)

Related Article
First Crack vs. Second Crack: What They Mean for Your Roast

Related Article
Coffee Roaster Machine Maintenance: Tips to Keep It in Shape!

Related Article
What is Coffee Chaff, and How Do You Manage It?


Related Article